How it works
A print size is a shape as well as a size. An 8 × 10 print is squarer than the photo most cameras and phones take, so something has to be cut. If you send the whole photo to a lab, the lab's software usually cuts from the centre and you find out when the print arrives. This tool lets you make that cut yourself, first.
When you choose a print size, the tool draws a frame with the same shape as the paper and makes it as large as your photo allows. Everything inside the frame is kept. Everything in the dimmed area is cut. Drag the frame to move it, and use the slider to make it smaller if you want to zoom in on part of the picture. The paper turns to match your photo, so a landscape photo gets landscape paper. "Turn the paper" switches it round when you want a tall print from a wide photo.
The crop is chosen in whole pixels of your original photo. Nothing is enlarged or shrunk. That is why the resolution figure is simple to work out:
PPI = crop pixels ÷ print inches. A crop 2,400 pixels wide printed 8 inches wide is 2,400 ÷ 8 = 300 pixels per inch. The tool shows this number as you drag, with a plain reading of what it means:
- 300 PPI or more: sharp in the hand. This is the usual target for prints you hold or look at closely.
- 150 to 299 PPI: fine on a wall, a little soft when held close.
- Under 150 PPI: limited. Expect visible softness. A smaller print size will look better.
When you press download, your browser copies the pixels inside the frame into a new image and saves it. The file name ends with the print size, such as holiday-8x10.jpg, so you can tell your crops apart.
A worked example with the sample photo
The built-in sample is an AI-generated photo of a blue bottle, 1,024 × 1,536 pixels. That is a 2:3 shape, the same as most camera photos turned upright. We loaded it into the tool and read off the numbers for each size. You can press "Try the sample" above and check them yourself.
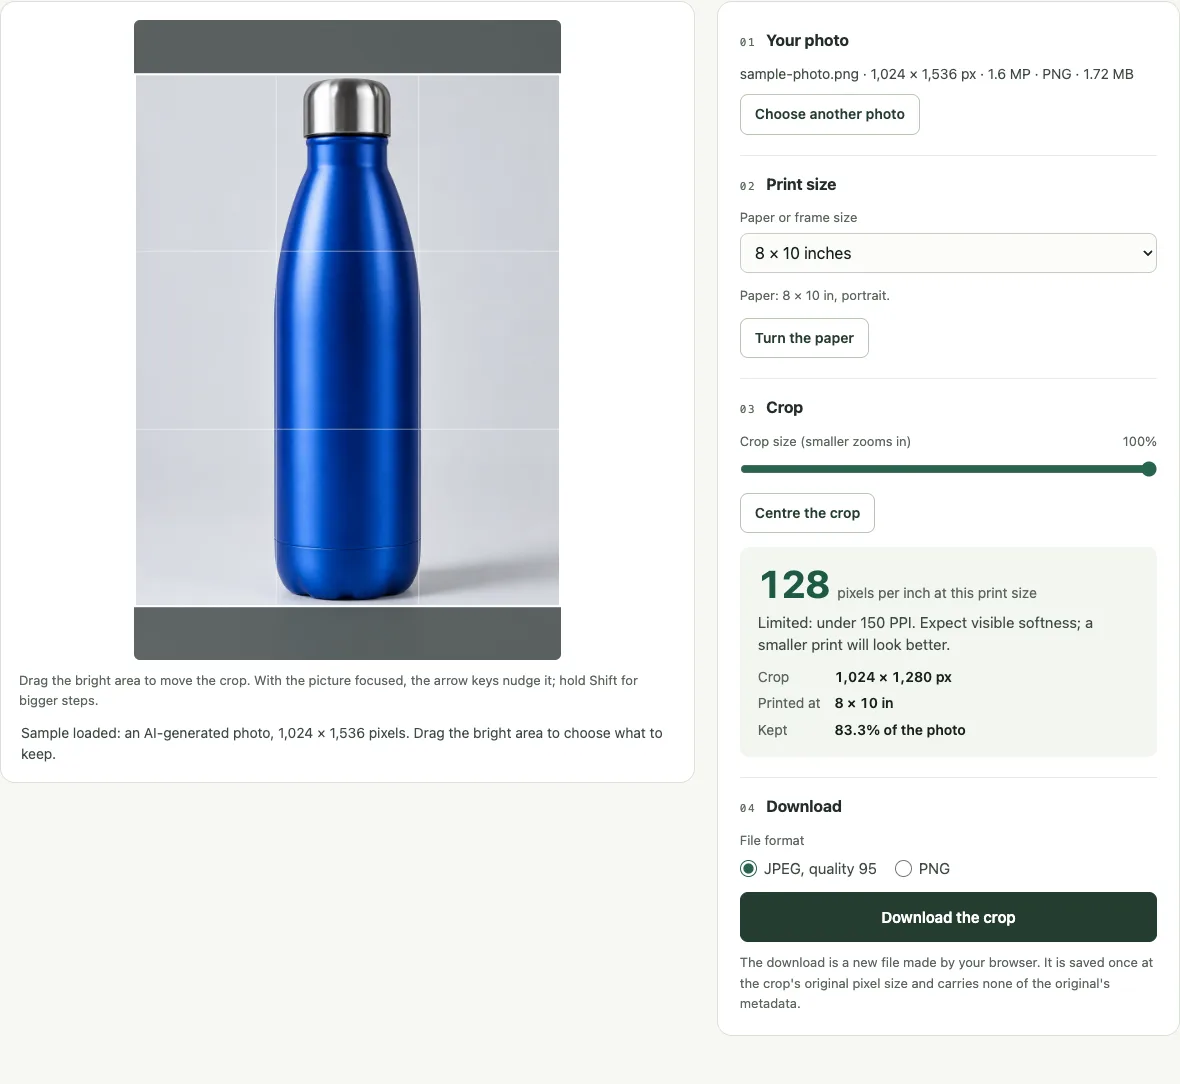
At 4 × 6 inches the paper has the same shape as the photo, so the frame covers all of it. The crop is 1,024 × 1,536 pixels, 100% of the photo is kept, and the print works out at 1,024 ÷ 4 = 256 PPI. That is in the "fine on a wall" band, close to sharp.
At 8 × 10 inches the paper is squarer. The largest frame that fits is 1,024 × 1,280 pixels, which keeps 83.3% of the photo and cuts 256 pixels from its height. With the frame centred, that is 128 pixels from the top and 128 from the bottom. Drag the frame up and you lose all 256 from the bottom instead. The print works out at 1,024 ÷ 8 = 128 PPI, which is under 150: this small sample is not enough for a good 8 × 10.
| Print size | Crop in pixels | Photo kept | PPI |
|---|---|---|---|
| 4 × 6 in | 1,024 × 1,536 | 100% | 256 |
| 5 × 7 in | 1,024 × 1,434 | 93.4% | 204 |
| 8 × 10 in | 1,024 × 1,280 | 83.3% | 128 |
| 11 × 14 in | 1,024 × 1,303 | 84.8% | 93 |
| A4 | 1,024 × 1,448 | 94.3% | 123 |
| 8 × 8 in | 1,024 × 1,024 | 66.7% | 128 |
Read from the tool on 11 November 2026. PPI is rounded down to a whole number.
We then downloaded the 8 × 10 crop and opened the file. It measured 1,024 × 1,280 pixels, the same as the readout, and the 4 × 6 download measured 1,024 × 1,536. A real 12-megapixel phone photo (4,032 × 3,024 pixels) has far more to work with: its largest 8 × 10 crop is 3,780 × 3,024 pixels, or 378 PPI.
What each print size cuts off
How much you lose depends on the shape of your photo. Most cameras take 3:2 photos. Most phones take 4:3 photos, which are a little squarer. The same print size treats them differently.
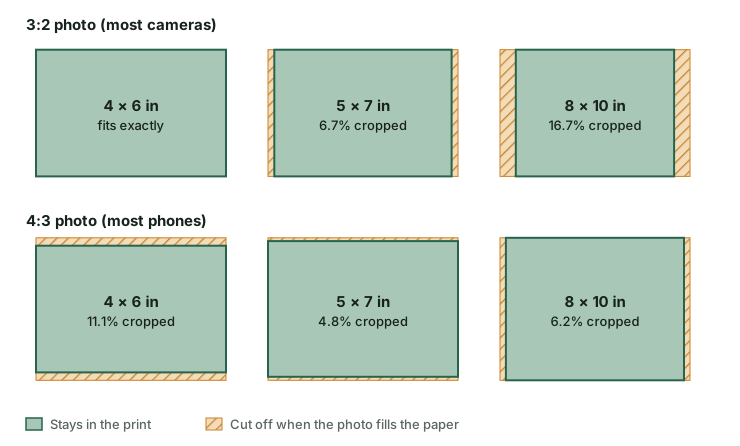
| Print size | 3:2 photo (camera) | 4:3 photo (phone) |
|---|---|---|
| 4 × 6 in | 0.0% | 11.1% |
| 5 × 7 in | 6.7% | 4.8% |
| 8 × 10 in | 16.7% | 6.2% |
| 11 × 14 in | 15.2% | 4.5% |
| A4 (210 × 297 mm) | 5.7% | 5.7% |
| 8 × 8 in (square) | 33.3% | 25.0% |
Cut share = 1 − (narrower shape ÷ wider shape). The "Kept" figure in the tool is 100% minus this when the crop is at its largest.
Two things stand out. A camera photo fits 4 × 6 with nothing lost, but the same photo loses a sixth of itself at 8 × 10. A phone photo is the other way round: it loses more at 4 × 6 than at 8 × 10. If a print has come back with a head or a pair of feet missing, this mismatch is usually why. The guide Why does my photo get cropped at 8 × 10? explains the shapes in more detail and lists the sizes that fit each photo shape exactly.
Choosing a good crop
- Decide what must stay. Faces, hands, a horizon, a signature. Move the frame until those sit comfortably inside it, then look at what the dimmed area removes.
- Leave a little room at the edges. Labs often trim a few millimetres from each side so the print has no white sliver, and a frame's lip covers a little more. Don't park anything important right on the frame line.
- Zoom in with care. Making the crop smaller throws pixels away, so the PPI drops. Watch the number as you move the slider. If it falls under 150, choose a smaller print size or a looser crop.
- Use the faint lines. The frame is divided into thirds. Placing a subject on a line, or a horizon along one, often looks better than dead centre.
- Try turning the paper. A wide photo can make a good tall print if the subject is upright, but the crop will be much smaller. The readout tells you what it costs.
If you only want to check a size without making a file, Print Size Check shows the PPI and the centred crop or borders for a photo, and exports nothing.
Limits and honest notes
- The download is re-encoded once. A crop has to be saved as a new image. JPEG at quality 95 keeps the loss small, but it is one more save on top of whatever the photo has already had. Our test of re-saving one photo 20 times shows what repeated saves cost. Crop from your original, once, rather than cropping a crop. Choose PNG if you want no further loss at all; the file will be much larger.
- The download carries no metadata from your photo. Your browser builds the new file from pixels alone, so the camera details, date, GPS location and embedded thumbnail in the original are not copied across. We opened the downloads and found no EXIF, XMP or IPTC data in them. That is useful for privacy, but it also means no copyright note. The guide What does photo metadata reveal? explains what those fields hold.
- Colour is saved as standard sRGB. That is what most print labs expect. In our test, Chrome added a small standard sRGB colour profile (456 bytes) to the JPEG and none to the PNG; the profile describes colour, not you or your camera. Other browsers may leave it out. If your photo uses a wider colour space, or your lab asks for a particular profile, crop in a photo editor instead.
- PPI is not a quality guarantee. It counts pixels. It cannot see blur, camera shake, noise or heavy compression. A 300 PPI crop of a blurred photo is a blurred print.
- Labs may still trim the edges. A file with exactly the right shape avoids a surprise crop, but many labs print slightly over the edge of the paper and trim. Check your lab's preview before you pay.
- One photo at a time, up to 40 MB and 50 megapixels. JPEG, PNG and WebP only. HEIC photos from an iPhone need converting first; the guide on printing phone photos covers that.
- Some phones can't build very large pictures. Browsers limit how big an image a web page can make, and phones have the lowest limits. If that happens the tool says so and makes no file. Use a smaller crop or a desktop browser.
- Nothing is enlarged. The tool never adds pixels. If the PPI is too low, the fix is a smaller print or a better original, not a bigger file.
Questions
Is my photo uploaded anywhere?
No. The photo is opened, drawn and cropped by your own browser on your own device. The page has no upload address to send it to. Closing or refreshing the page clears the photo from the tool.
Does cropping reduce the quality?
Cropping removes pixels outside the frame and leaves the ones inside as they were, so the part you keep is not resized. The saved file is a new JPEG at quality 95, which is one extra save. For a single crop from an original, that loss is very hard to see. Choose PNG to avoid it entirely.
What PPI do I need for a print?
Aim for 300 PPI for prints people hold, and 150 to 200 PPI for prints seen from further away, such as a frame on a wall. Below 150 PPI softness starts to show. The guide Photo print sizes and PPI has a chart of the pixels needed for every common size.
Why is the photo upright here when it looks sideways elsewhere?
Phones often save a photo sideways with a note saying which way up to show it. This tool follows that note when it opens the photo, and saves the crop the right way up with no note needed. An old program that ignores the note would show the original on its side.
My size isn't in the list. Can I still use it?
Yes. Choose "Custom size", then type the width and height in inches or millimetres. The frame takes that shape, and the file name ends with the size you typed.
Should I add a border or bleed?
This tool doesn't add either. Most consumer labs want a file with the same shape as the print and handle their own trim. If a lab or a printer asks for bleed, follow its template. The checklist in How to prepare a photo for a print lab covers edges, colour and brightness.
Related guides
- Why does my photo get cropped at 8 × 10? Print shapes, how much each size cuts, and the three ways to handle a mismatch.
- Photo print sizes and PPI: chart and calculator The pixels needed for each print size at 300, 200 and 150 PPI.
- How to prepare a photo for a print lab A seven-step checklist from the original file to the order.
- Printing phone photos: HEIC, Live Photos and portrait mode What your phone really saved, and how large it prints.
Independent tool by Tidy (Infinite Dev Works). Labs differ in how they trim, so check your lab's preview before ordering.